Job Based Resume
A Job Based Resume is a resume that's linked to a specific job posting. Flux Resume reads the job description, matches it against your experience, and lets you AI-optimize the resume so it lines up with what the role is asking for.
Where to start a Job Based Resume
There are three places in the app that kick off the same flow:
- Job Search (
/apps/jobs) - the Job Based Resume button on a job's detail panel. This is the most common path. - Resume Builder (
/pages/documents) - create a blank resume first, then attach a job to it. - Job Tracker - any job you've already saved has a Job Based Resume option in its menu.
The walkthrough below uses the Job Search path because the job details flow straight into the editor, no copy-pasting required.
Step 1: Pick a job and click Job Based Resume
Open Job Search from the sidebar and click any job in the list. On the job's detail panel, the action row in the top right has three buttons: bookmark, Apply Now, and Job Based Resume.

Click Job Based Resume. Two things happen at once:
- The job is saved to Job Tracker with a Bookmarked status (if it wasn't already).
- A new resume is generated, linked to that job, and named after it (e.g. Software Developer @ Outlier).
After it finishes, the panel refreshes:
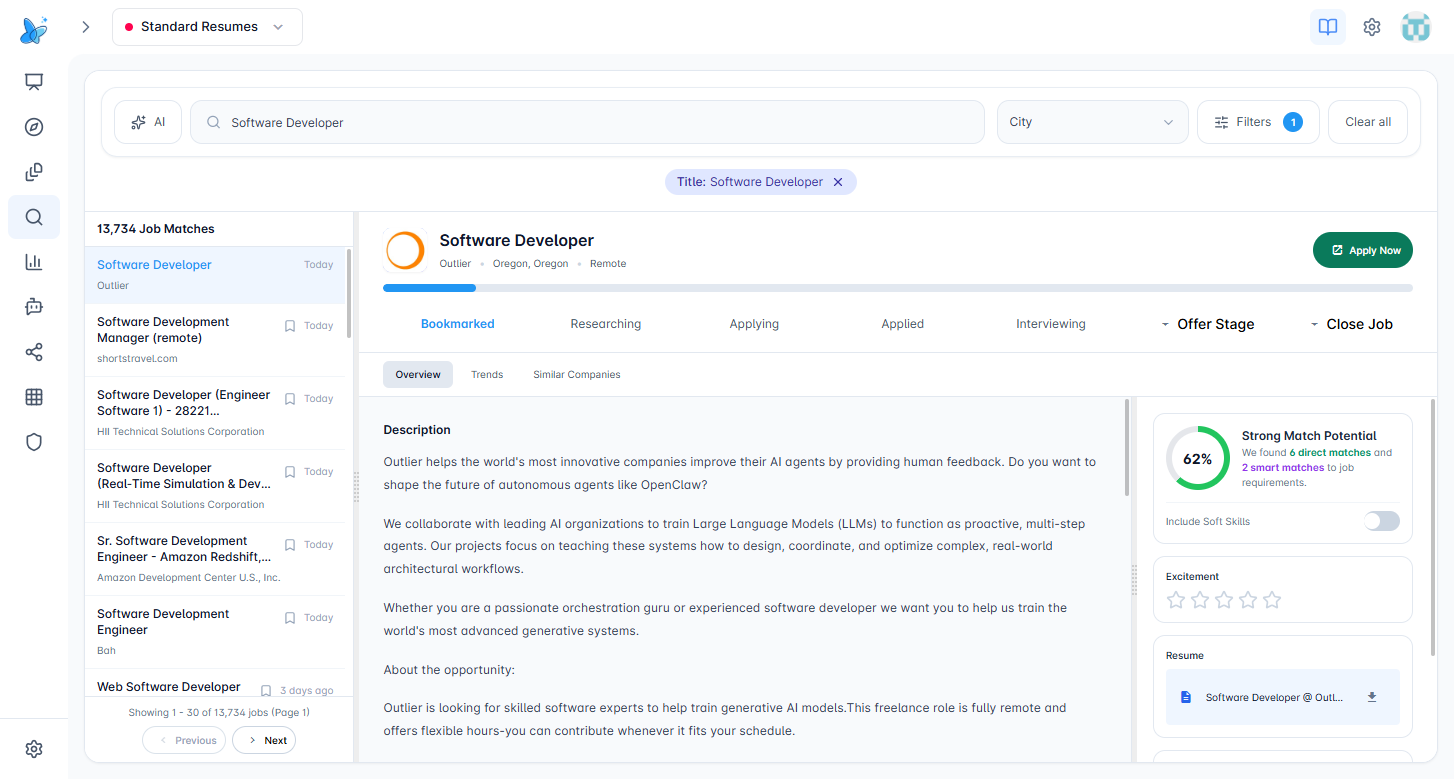
You'll notice three changes:
- The Job Based Resume button is gone, because the resume now exists.
- A status pipeline (Bookmarked, Researching, Applying, Applied, Interviewing, Offer Stage, Close Job) appears so you can move the job through your funnel.
- A Resume card shows up on the right with a link to the new resume and a download button.

Click the resume name to open the editor with the job already attached. Because it was created from the job, the description, company, and requirements are all pre-filled, so you land directly on the Job Matcher view.
Step 2: Read the analysis
The editor opens on the job-matcher panel. The top of the panel is the analysis header.
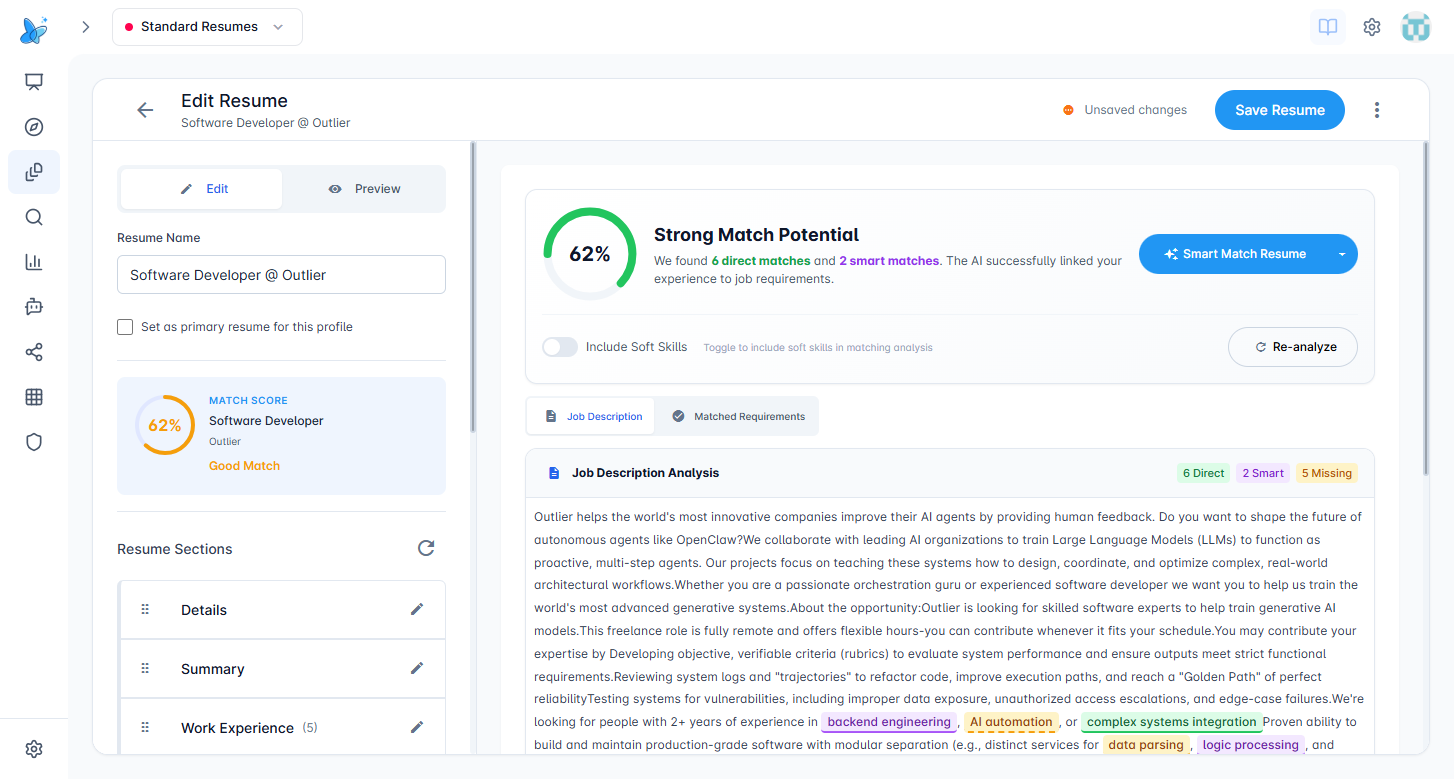
The header tells you three things:
- Match score (the donut on the left, also shown in the left-hand Match Score card). Below ~50% is a weak match, 50–70% is a good match, 70%+ is strong, 85%+ is excellent.
- Direct matches and smart matches. Direct matches are skills the job asks for that already appear in your resume word-for-word. Smart matches are things you have under a different name (e.g. "Server-Side Development" matched against "backend engineering").
- Two action buttons: Smart Match Resume runs the AI optimization, Re-analyze re-runs the matching without changing any content.
The Include Soft Skills toggle decides whether soft skills (communication, leadership, etc.) count toward the score. Off by default.
Job Description tab
The first tab highlights every keyword the matcher found in the job description, color-coded:
- Green highlights are direct matches (already in your resume).
- Yellow / orange highlights are smart matches (semantic match).
- The Missing count in the header is everything the job asks for that's nowhere in your resume.
Skim it to get a quick read on what the role cares about most.
Matched Requirements tab
Switch to Matched Requirements for a side-by-side breakdown.
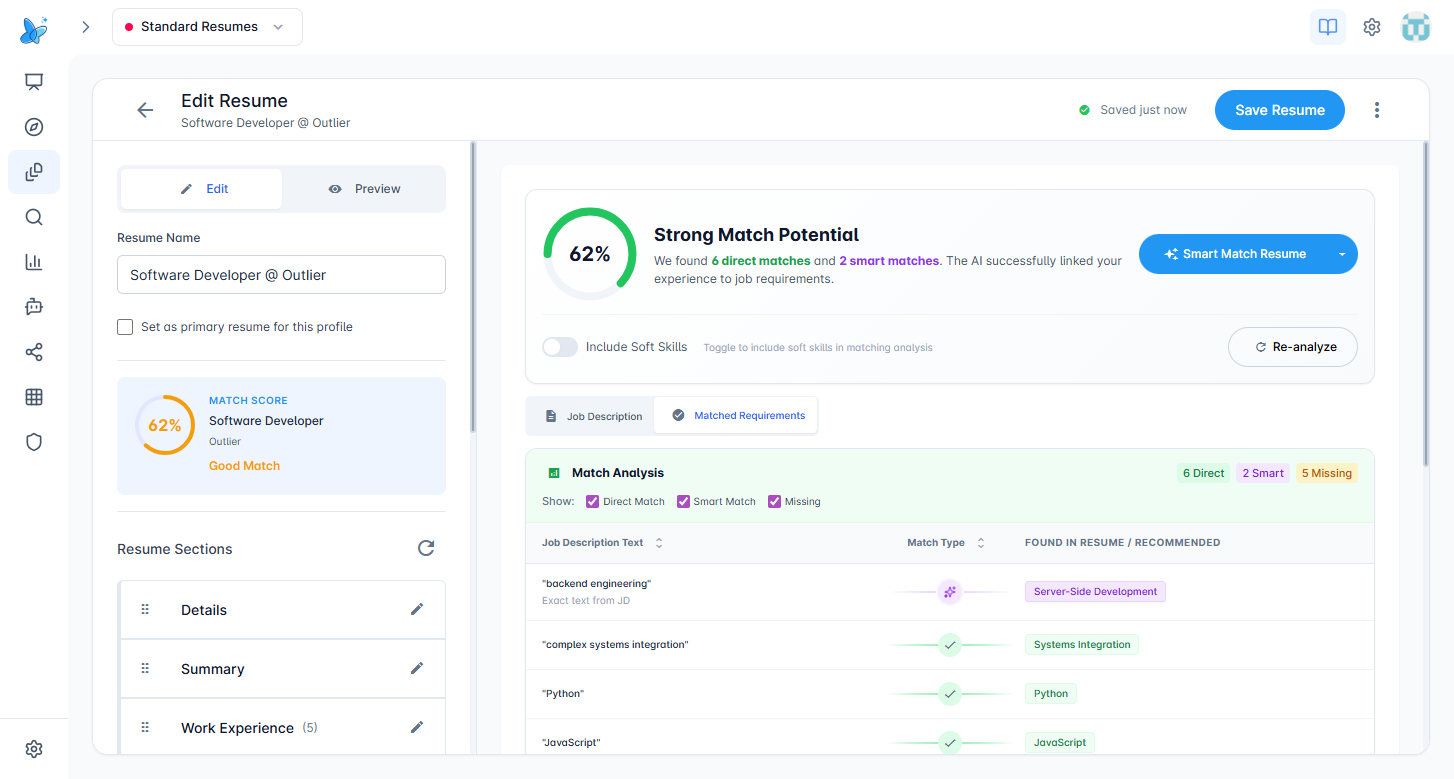
Each row is one requirement from the job description, paired with how it's matched and what's in your resume:
- Direct Match (green check) - exact text match.
- Smart Match (sparkle icon) - semantic match, e.g. "backend engineering" → "Server-Side Development".
- Missing (red) - in the job description, not in your resume.
Use the Direct Match / Smart Match / Missing checkboxes at the top to filter the table down to just the rows you care about.
Step 3: Run Smart Match Resume
When you've read the analysis and you're happy to let the AI tailor the resume, click Smart Match Resume in the header.
The AI rewrites your professional summary and bullet points, weaves in the matching skills and keywords, and addresses gaps where it can. While it runs, the button is disabled and the score recomputes.
When it finishes, the score jumps and a third tab appears: Optimized Match Assessment.
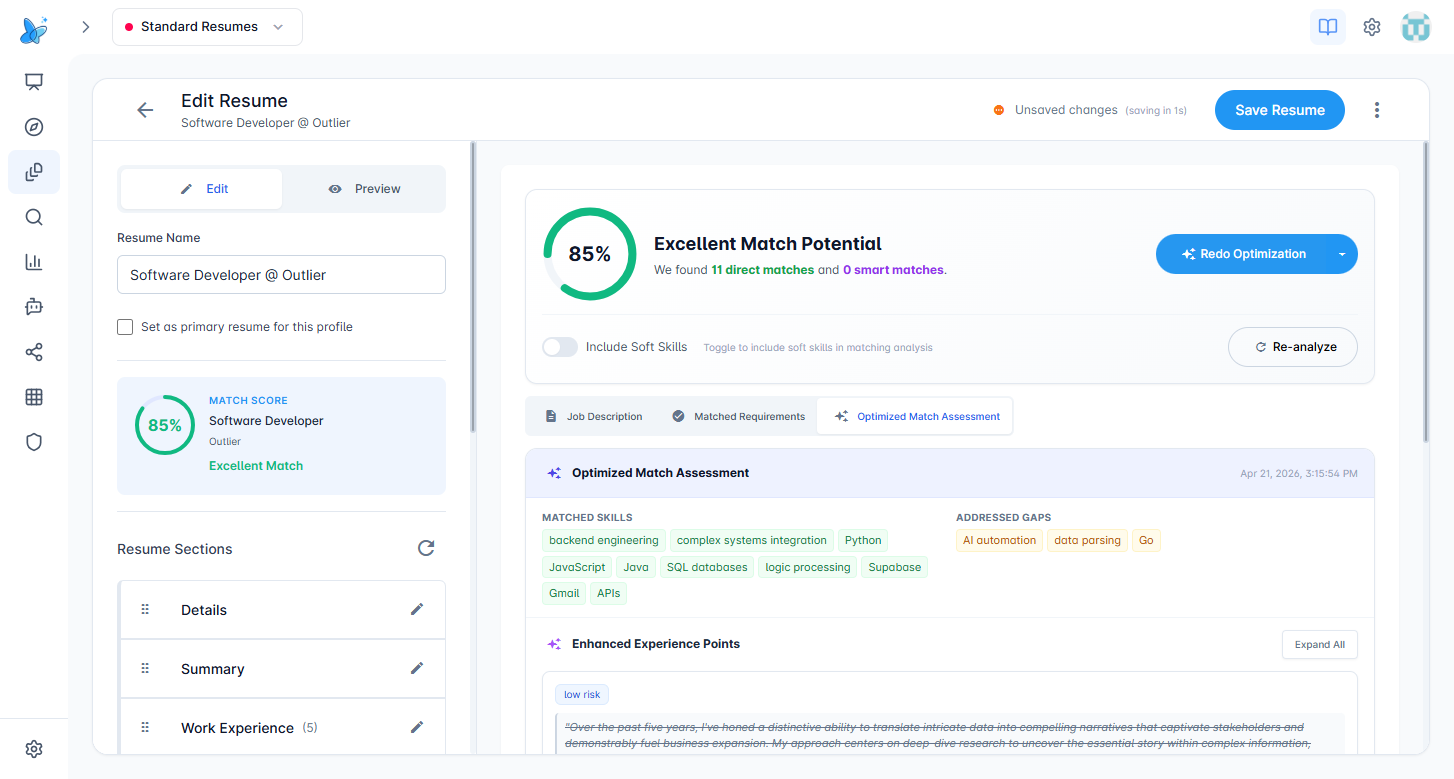
What changed in this example:
- Score went from 62% Good Match to 85% Excellent Match.
- Direct matches went from 6 to 11, and missing requirements went down to 0.
- The header button is now Redo Optimization (with the option to re-run if you keep editing the resume).
- The Match Score card on the left also reflects the new 85% / Excellent Match.
Step 4: Review the Optimized Match Assessment
The new tab is where you see exactly what the AI did.
Matched Skills and Addressed Gaps
At the top, two chip groups show the result of the optimization:
- Matched Skills (green) - keywords that are now present in the resume because of the rewrite.
- Addressed Gaps (orange) - skills that were missing before, and where the AI added them.
Enhanced Experience Points
Below that, every change the AI made is listed as a before/after pair.
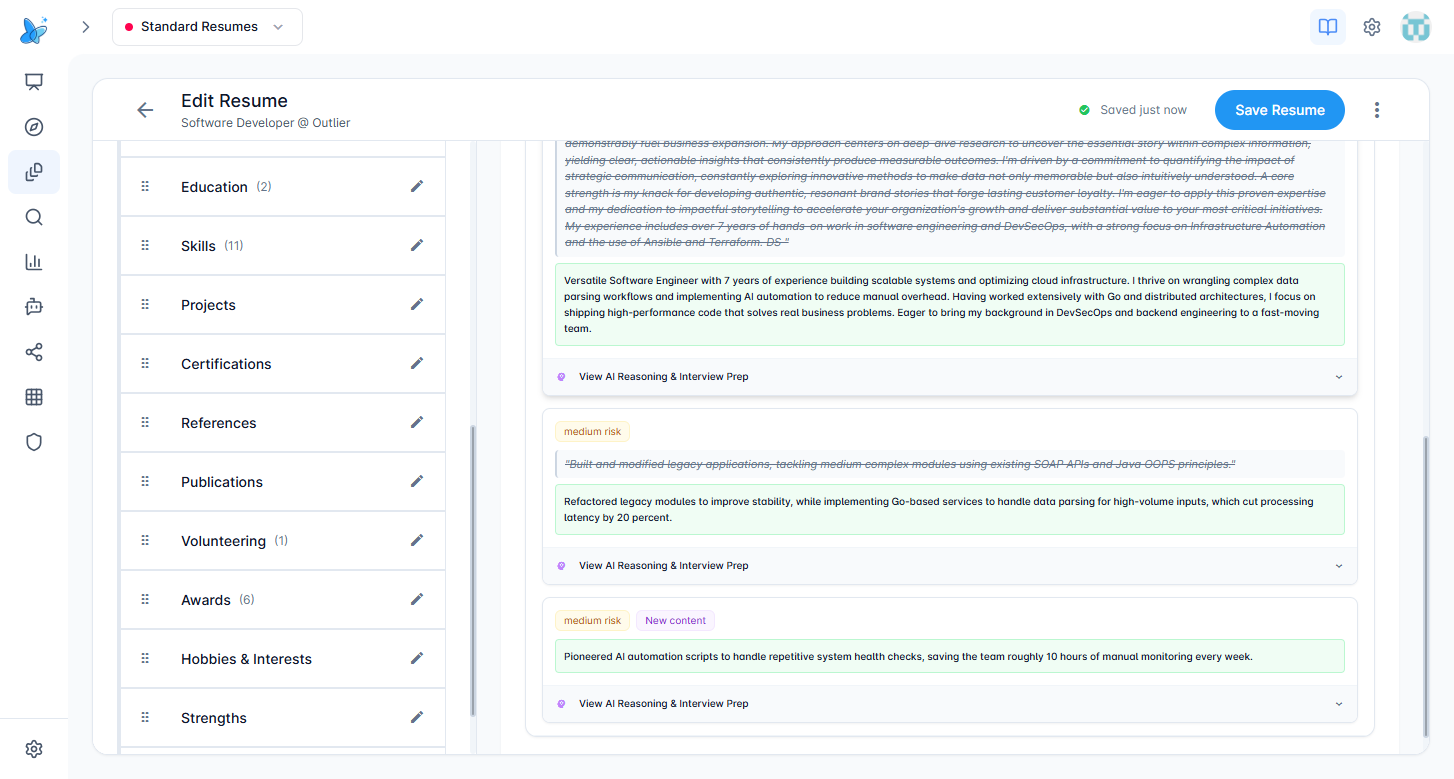
Each card shows:
- A risk badge (low risk, medium risk, etc.) - how much the AI changed the meaning. Low-risk edits are safe rewordings; medium-risk edits add or rephrase claims, so review them.
- The strikethrough text (red) is what was in your resume.
- The green text is the new wording the AI is proposing.
- A New content badge marks bullets the AI added that weren't there before.
- View AI Reasoning & Interview Prep expands to show why the AI made the change and what kind of follow-up question an interviewer might ask, so you can be ready to back up the new wording in person.
Read each one. The AI is good but not perfect, and you're the one who has to defend the resume in an interview. Edit anything that overstates your experience.
Step 5: Save and use the resume
Auto-save runs in the background while you edit. The header shows Saved just now when it's caught up, or a count-down when there are unsaved changes.
When you're done:
- Click Preview (top of the left panel) to see the rendered resume.
- Use Download in the preview bar to grab the PDF.
- The job stays linked, so this resume now shows up in Job Tracker under the job and on the Resume Builder grid with the company and match score.
To re-run the AI later (e.g. after you edit your work history), open this same panel and click Redo Optimization.
Tips
- Run Re-analyze before Smart Match Resume if you've been editing the resume manually. It refreshes the score without changing your text, so you can decide whether you still need the AI pass.
- If the score is already in the 80s, Smart Match Resume usually only adds polish. Run it anyway and review the diffs, but don't expect a huge jump.
- Always read the medium risk cards. Those are where the AI is most likely to embellish.
- The job stays linked to this one resume only. To target the same role at a different company, run Job Based Resume from that company's posting in Job Search.
- Switching profiles (top-bar dropdown) hides this resume from view but doesn't delete it. Switch back to the original profile to see it again.